Introduction
Linux is very easy to understand at first it looks difficult because you are used to windows style file and folders view. Linux file system starts at "/" which is called root. That's how linux file system looks like with directories under root:
So to traverse between directories you would do
:~$cd /home/username
Today linux has become mainstream, you see gadgets, smartphones, netbooks, laptops have pre-installed linux and are running smooth. Not to forget Android with the largest market share based on core linux is the smartphone OS.
What we will cover today
In my last blog post I covered installing SSH server on windows and creating SSH proxy. Today we will learn how to clean install Ubuntu Server (no gui) and setting it up as our basic home media / file server.
This machine ideally has to be online 24/7 and connected via LAN cable rather than wifi as you need good speed during media sharing, file sharing and vpn etc.
Pre-requisites
- Download ubuntu server iso file from Ubuntu website (link).
- Download unetbootin (link) for your OS.
- USB Pen drive with minimum 4 GB space
Let the show begin
Step 1: Format the usb drive to fat32. This is very easy insert your USB pendrive in any windows machine and in right click the drive letter to choose "Format". Select Fat32 while formatting.
Step 2: Now select the iso file that you downloaded, choose the usb drive and press ok to prepare the bootable usb drive.

Step 3: Once the usb is ready, reboot your machine. Now here is the tricky part:
This will depend on the manufacturer of your machine in many cases its the F10/F12 key that prompts user to select what drive to boot from. You have to be quick or keep hitting F10/F12 key to arrive at that menu. Once you are there - : "Choose USB Drive at this prompt. My dad has done it so anyone can do it :-).
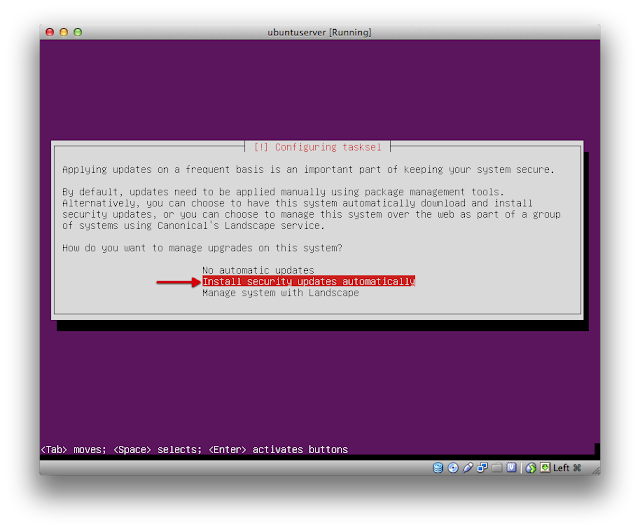
Step 4: From here just take a look at the screenshots below and they are self explanatory. Navigate using TAB and Up / Down Arrow keys to navigate.


Step 2: Now select the iso file that you downloaded, choose the usb drive and press ok to prepare the bootable usb drive.

This will depend on the manufacturer of your machine in many cases its the F10/F12 key that prompts user to select what drive to boot from. You have to be quick or keep hitting F10/F12 key to arrive at that menu. Once you are there - : "Choose USB Drive at this prompt. My dad has done it so anyone can do it :-).
Step 4: From here just take a look at the screenshots below and they are self explanatory. Navigate using TAB and Up / Down Arrow keys to navigate.


 |
| If you are Advanced User then select Manual else do the previous selection of "GUIDED" |


Above snapshot brings us to the last part. After this we can choose additional software that we can select now and install.
- Openssh is a server that allows ssh clients to connect to server remotely and pass control commands.
- LAMP stands for - Linux, Apache, MySQL and PHP engine to set up webserver (Microsoft has IIS and Microsoft SQL).
- Samba file server to allow file sharing cross platform (Windows/MacOSX and Linux)
- Press Continue.

If everything goes well you will see reboot prompt and the machine will reboot. Remove the usb drive from the slot.
Thats all.
The machine will boot to ubuntu operating system with following screen. Enter the username that you created and password that you typed in while installing ubuntu.

You should see the following prompt now. Thats it!

You have successfully installed ubuntu and its up and running. Next steps on fine tuning and connecting remotely to the ubuntu server via ssh in my next blog post.
No comments:
Post a Comment